Installation Guide Navigation
Northern Michigan Field-Tested Installation Expertise
This Starlink Gen 3 installation guide combines hands-on testing of the Justech aluminum mount kit with proven installation techniques from 50+ outdoor internet setups across northern Michigan’s challenging environments including remote cabins, lakeside properties, and off-grid locations near Ludington and surrounding areas.
Our team at Outdoor Tech Lab specializes in satellite internet solutions tested specifically in Great Lakes weather conditions – from lake-effect snow loads to high winds off Lake Michigan.
This regional testing experience ensures our recommendations work in the harsh winter conditions common to northern Michigan installations.
📡 Justech Gen 3 Mount Quick Facts
❌ Skip If: Temporary use, budget constraints, DIY-averse users
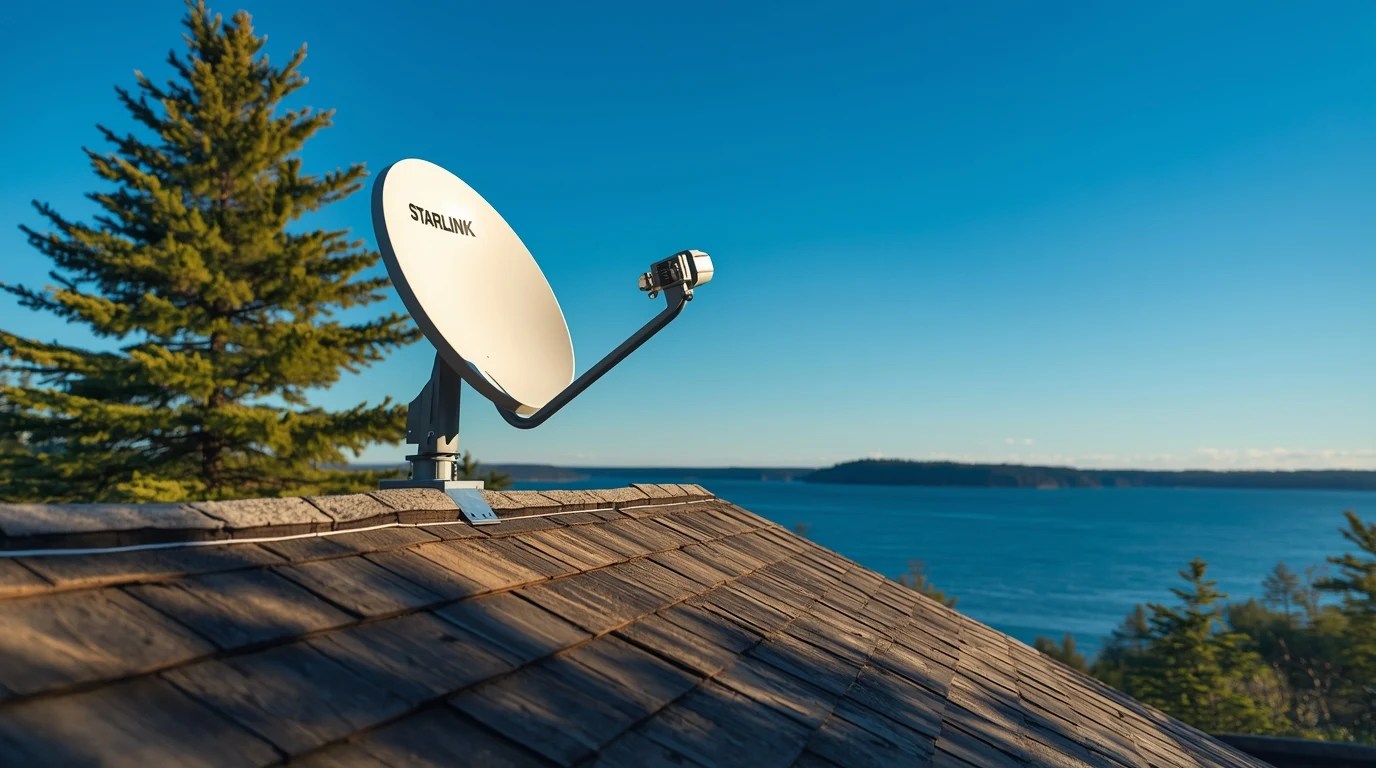
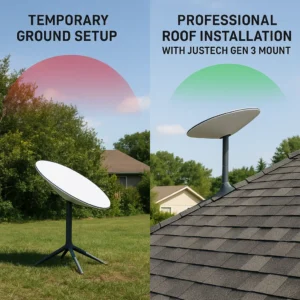
Installing your Starlink Gen 3 dish with a professional mounting system transforms your satellite internet from a temporary setup to a permanent, weatherproof solution capable of delivering optimal signal performance in any conditions.
This comprehensive installation guide covers every aspect of mounting your Starlink Gen 3 using the Justech aluminum mounting kit, from site selection and signal optimization to weatherproofing and troubleshooting common installation challenges.
Whether you’re setting up permanent internet for a remote cabin, upgrading from a temporary ground setup, or need professional-grade mounting for the harsh winter conditions coming to northern Michigan, this step-by-step guide provides tested techniques that ensure maximum signal strength and long-term reliability through lake-effect snow and freezing temperatures anywhere you live.
📡 Equipment Overview: What’s Included and What You’ll Need
Proper Starlink Gen 3 installation requires understanding both the included mounting hardware and additional tools needed for professional-grade setup that withstands outdoor conditions and weather extremes.
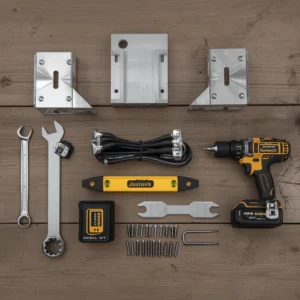
✅ Justech Mount Kit Includes
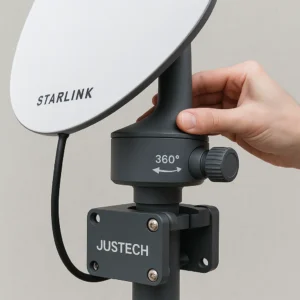
- Aluminum mounting bracket – Main dish attachment point with 360° rotation
- Pipe adapter – Connects dish to mounting pole system
- Bent and straight pipes – Positioning components for optimal angle
- Mounting screws – Both wood and masonry/concrete options
- Installation wrenches – Sized specifically for included hardware
- Stainless steel expansion bolts – Weather-resistant fasteners
- Plastic expansion sleeves – Secure mounting in various materials
🔧 Additional Tools Required
- Drill with masonry/wood bits – Sized to match included screws
- Level – Essential for proper dish alignment
- Measuring tape – For precise positioning and clearance
- Stud finder – Locate structural support for wall mounting
- Safety equipment – Ladder, safety harness for roof work
- Weatherproof sealant – Silicone caulk for penetration sealing
📋 Complete Installation Checklist
Why aluminum construction matters for outdoor satellite installations
Material Advantage: The Justech mount’s aluminum alloy construction provides superior corrosion resistance compared to steel alternatives, crucial for installations exposed to rain, snow, and salt air that can cause rapid degradation of inferior mounting hardware.
Load-Bearing Capacity: With 2.46kg capacity, this mount handles the full weight of the Starlink Gen 3 dish plus wind loading, ice accumulation, and dynamic forces that can stress mounting systems during severe weather events.
🔧 Pre-Installation Planning and Site Assessment
Successful Starlink installation begins with thorough site evaluation, signal path analysis, and preparation that prevents common mistakes leading to poor performance or reinstallation requirements.

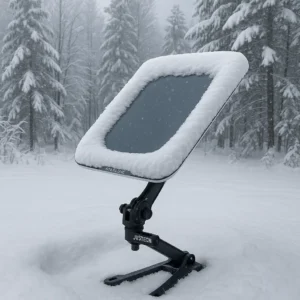
Winter Installation Considerations for Northern Michigan
Critical for fall 2025 installations preparing for harsh winter conditions
Seasonal Installation Timing: Fall installation of the Justech mount provides significant advantages for northern Michigan users, allowing proper weatherproofing and system testing before lake-effect snow and sub-zero temperatures arrive in late November and December.
Snow Load Planning: The aluminum construction and reinforced mounting system handle the heavy snow loads common to the Great Lakes region.
However, positioning the dish with adequate clearance prevents snow accumulation from blocking satellite signal during extended winter storms.
Northern Michigan Winter Preparation Checklist
- Snow Clearance: Position dish with 18+ inches clearance below for snow accumulation
- Ice Prevention: Ensure proper drainage around mount to prevent ice damming
- Wind Load Verification: Test mount security before winter storm season
- Cable Winterization: Use cold-rated sealants for sub-zero performance
- Access Planning: Ensure safe winter access for maintenance and snow clearing
- Backup Power: Consider UPS systems for power outage scenarios common in winter storms
Temperature Performance Advantage: Installing now allows verification of system performance across the temperature transition from fall into winter, ensuring the Justech mount maintains stability and adjustability even when temperatures drop below -10°F typical of northern Michigan winters.
Sky View Requirements and Obstruction Analysis
Starlink App Integration: Before any physical installation work, use the official Starlink app’s obstruction scanner to verify your chosen location provides adequate sky view.
This tool prevents costly repositioning after mounting hardware is installed.
Critical first step for optimal Starlink Gen 3 performance
Clear Sky Zone: The Starlink app’s obstruction checker identifies areas with optimal satellite visibility, eliminating guesswork in positioning decisions.
Use this tool at your proposed mounting location during different times of day to account for sun angle variations.
Obstruction Assessment Checklist
- Trees: Account for seasonal growth and leaf coverage changes
- Buildings: Measure angles to nearby structures using smartphone inclinometer
- Power lines: Maintain safe distances and consider signal interference
- Future construction: Consider planned buildings or landscaping
- Snow accumulation: Factor potential buildup that could block signal
Pro Tip: The north-facing direction typically requires the most clear sky for optimal satellite constellation visibility.
Structural Assessment for Mount Placement
Wall Mounting Considerations: Locate structural studs or masonry anchors capable of supporting the mount plus wind loading.
Standard drywall anchors are insufficient for secure Starlink mounting.
Roof Mounting Requirements: Identify roof material type and underlying structure.
Different mounting approaches are required for shingles, metal roofing, tile, or flat roof membranes.
⚠️ Safety and Structural Warnings
Roof Work: Use proper ladder safety and consider professional installation for steep or high roofs.
Falls during satellite installation account for significant injury statistics.
Electrical Safety: Maintain safe distances from power lines and electrical equipment. Starlink dishes can conduct electricity if they contact live wires.
Weather Conditions: Never attempt installation during rain, high winds, or icy conditions that compromise safety and installation quality.
📍 Optimal Placement Strategies for Maximum Signal Performance
Starlink Gen 3 placement significantly impacts signal strength, connection stability, and long-term performance, requiring strategic positioning that balances signal optimization with practical mounting considerations.
Height and Elevation Guidelines
Maximizing line-of-sight for satellite constellation access
Elevation Benefits: Higher mounting positions typically provide better satellite visibility and reduced ground-based interference.
Each additional foot of elevation can expand the clear sky zone and improve signal margins during challenging weather.
Practical Height Limits: While higher is generally better, practical considerations include cable length limitations, maintenance accessibility, and local building codes that may restrict antenna heights.
Optimal Mounting Locations by Priority
- Highest roof point – Maximum elevation and 360° access
- South-facing roof section – Primary satellite constellation view
- Gable end mounting – Good height with wall-mounting convenience
- Elevated pole mount – Flexible positioning away from structures
- Ground level with clear sky – Easiest access but requires larger clear zone
Cable Routing and Power Planning
Cable Length Limitations: The Starlink Gen 3 system includes 150 feet of integrated cable between the dish and power injector. This proprietary Starlink cable is specifically designed for outdoor use with weather-resistant construction that handles temperature extremes from -40°F to 185°F.
Plan your mounting location to ensure this length reaches your desired router location without requiring extensions that could affect signal quality.
Recommended Cable Type: Starlink Gen 3 uses a proprietary cable that combines power and data transmission in a single weatherproof cable.
Unlike standard ethernet cables, this outdoor-rated cable cannot be replaced with generic alternatives without losing power delivery capability and weather protection.
Power and PoE Planning: The Starlink system requires a PoE (Power over Ethernet) injector that needs standard AC power near your router location.
Plan the installation to ensure both cable routing and power access are available at your equipment location.
Entry Point Selection: Plan the cable entry point to minimize weather exposure while maintaining the cable’s bend radius requirements.
Sharp bends can damage the proprietary Starlink cable and void warranty coverage.
Grounding Considerations: Check local electrical codes to determine if grounding is required for your installation.
Many areas require proper grounding for outdoor antenna installations to protect against lightning damage and electrical hazards.
Drip Loop Formation: Always create a drip loop where the cable enters the building to prevent water from following the cable into interior spaces.
⚙️ Complete Step-by-Step Installation Process
Professional Starlink Gen 3 installation with the Justech aluminum mount requires systematic approach ensuring structural integrity, weather resistance, and optimal signal performance.
Site Preparation and Marking (15-20 minutes)
Mark mounting points: Use the Justech bracket as a template to mark precise drilling locations. Double-check measurements and ensure level positioning using a spirit level.
Verify clearances: Confirm the mounted dish will have adequate clearance for 360° rotation without contacting roof features, gutters, or other obstacles.
Cable routing path: Plan and mark the cable path from the mount location to the interior equipment, ensuring proper bend radius and weather protection.
Drill Mounting Holes (10-15 minutes)
Hole sizing: Use drill bits sized specifically for the included mounting hardware. For masonry, use carbide-tipped bits and drill slowly to prevent cracking.
Depth control: Drill to the depth specified for the expansion bolts, typically 2-3 inches for secure holding power in most materials.
Debris removal: Clean drilled holes thoroughly to ensure proper expansion bolt seating and maximum holding strength.
Install Base Mounting Bracket (10-15 minutes)
Expansion bolt installation: Insert stainless steel expansion bolts with plastic sleeves, tightening gradually to ensure even expansion and secure hold.
Level verification: Double-check bracket level before final tightening, as adjustment becomes difficult after bolts are fully set.
Torque specifications: Tighten to manufacturer specifications using the included wrenches to prevent over-tightening that could damage threads.
Dish Preparation and Cable Routing (10-15 minutes)
Remove kickstand: Locate the release tab on the Gen 3 dish and squeeze to remove the kickstand, which is not needed for permanent mounting installations.
Attach mast adapter: Connect the Justech mast adapter plate to the dish, ensuring it snaps securely into place with proper orientation for your mounting configuration.
Cable routing: Feed the Starlink cable through the designated slot on the adapter plate and route it properly to prevent stress on connections during installation.
Moisture seal verification: When connecting the cable to the dish, ensure the moisture seal is flush with the dish’s connection point to maintain weatherproofing integrity.
Mount Installation and Structural Attachment (15-20 minutes)
Structural alignment: Position the Justech mount to align with structural beams or solid mounting surfaces, avoiding attachment to siding or non-structural materials.
Pilot hole marking: Use the mount as a template to mark precise pilot hole locations, double-checking alignment and level positioning before drilling.
Drilling and preparation: Drill pilot holes using appropriate bits for your mounting material, cleaning debris thoroughly for optimal hardware engagement.
Sealant application: Apply silicone sealant to drilled holes to prevent water infiltration that could cause structural damage over time.
Mount securing: Install the mount using provided lag bolts or expansion hardware, tightening to manufacturer specifications for secure attachment.
Final Assembly and System Connection (10-15 minutes)
Mast installation: Insert the prepared mast assembly (with attached dish and cable) into the Justech mount, pressing firmly until the connection clicks securely into place.
Cable routing to interior: Route cables through planned entry points to your interior router location, maintaining proper bend radius throughout the cable run.
Interior connections: Connect cables to the PoE injector and router inside, following Starlink’s connection sequence for proper system initialization.
System activation: Power on the router and use the Starlink app to complete setup, monitoring initial connection and signal quality metrics.
📶 Signal Optimization and Performance Tuning
After physical installation, optimizing your Starlink Gen 3 system involves fine-tuning positioning, monitoring signal metrics, and addressing environmental factors that impact satellite connectivity performance.
Using Starlink App for Alignment Verification
Essential tool for professional installation validation
Obstruction Analysis: The Starlink app provides real-time obstruction detection, showing exactly which areas of the sky view are blocked and how this impacts connectivity performance.
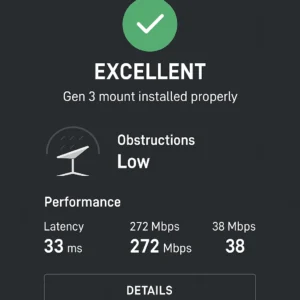
Signal Strength Monitoring: Monitor signal-to-noise ratio, latency, and throughput metrics during the first 24-48 hours to identify any positioning adjustments needed for optimal performance.
Key Performance Metrics to Monitor
- Obstruction percentage: Target less than 2% for optimal performance
- Downlink throughput: Should consistently exceed 50 Mbps in clear conditions
- Latency: Typical range 20-40ms for good satellite connectivity
- Uptime percentage: Monitor for frequent disconnections indicating alignment issues
- Signal quality: Higher values indicate better positioning and fewer obstructions
Fine-Tuning Mount Positioning
360° Rotation Advantage: The Justech mount’s full rotation capability allows precise positioning adjustments based on actual signal performance rather than theoretical positioning.
Seasonal Adjustments: Monitor performance across seasons as tree foliage, snow accumulation, and atmospheric conditions change, adjusting position as needed using the mount’s adjustment features.
Common Signal Optimization Scenarios
Partial Tree Obstruction: Use the mount’s tilt and rotation adjustments to find the optimal compromise between tree clearance and satellite constellation access.
Building Interference: Even minor building obstructions can significantly impact performance. Small positioning adjustments often yield major improvements.
Weather Performance: Monitor performance during various weather conditions to verify the installation handles rain, snow, and wind without significant degradation.
❗ Common Installation Issues and Solutions
Professional Starlink installation troubleshooting addresses the most frequent challenges encountered during Gen 3 setup, providing proven solutions that prevent costly reinstallation and optimize system performance from day one.
Signal and Connectivity Problems
Most common issues affecting Starlink Gen 3 performance
Problem: “Searching for Satellites” Extended Periods
Symptoms: Dish remains in search mode for more than 15 minutes, unable to establish initial connection.
Solutions:
- Verify dish has completely unobstructed sky view using Starlink app
- Check that dish is level using a spirit level on the mounting surface
- Ensure cables are fully connected and undamaged
- Power cycle the system by unplugging for 30 seconds
- Confirm you’re in an active Starlink service area
Problem: Frequent Disconnections and Outages
Symptoms: Connection drops multiple times per hour, inconsistent performance, high latency spikes.
Solutions:
- Use Starlink app to identify and eliminate obstruction sources
- Verify mount stability – loose mounting can cause micro-movements affecting alignment
- Check for electronic interference from nearby devices or power lines
- Monitor performance across different weather conditions to identify patterns
- Consider relocating dish if current position has marginal sky view
Physical Installation Challenges
Problem: Mount Won’t Secure Properly
Symptoms: Brackets feel loose, mount moves under wind load, hardware doesn’t tighten fully.
Solutions:
- Verify you’re using correct drill bit size for expansion bolts
- Check that mounting surface is structurally sound (not just siding or drywall)
- Ensure expansion bolts are fully inserted and properly expanded
- Consider using additional backing plates for hollow wall installations
- Upgrade to longer bolts if mounting through thick materials
⚠️ When to Call a Professional
Structural Concerns: If you’re unsure about mounting surface strength or need to penetrate roofing materials, professional installation prevents costly water damage and ensures code compliance.
Electrical Safety: Any installation near power lines or electrical equipment requires professional assessment to prevent electrocution hazards.
Height and Access: Installations above single-story height or on steep roofs present fall risks that justify professional installation costs.
📊 Starlink Gen 3 Mount Comparison: Justech vs Alternatives
Understanding how the Justech aluminum mount compares against alternative mounting solutions helps determine optimal hardware selection for specific installation requirements and budget considerations.
| Mount Option | Material | Adjustability | Price Range | Best Use Case |
|---|---|---|---|---|
| Justech Aluminum Kit | Aluminum alloy | 360° + 20° tilt | $28.99 | Permanent installations |
| Original Starlink Mount | Plastic composite | Limited adjustment | $49-69 | Temporary setups |
| Steel Pole Mount | Galvanized steel | Fixed position | $45-85 | Ground installations |
| Penetrating Roof Mount | Stainless steel | 360° rotation | $75-120 | Permanent roof setup |
| Non-Penetrating Mount | Steel + concrete | Limited adjustment | $85-150 | Rental properties |
✅ Justech Mount Advantages
- Superior Adjustability: 360° rotation plus tilt for optimal positioning.
- Aluminum Construction: Corrosion-resistant for long-term outdoor use.
- Complete Kit: All hardware included for immediate installation.
- Professional Quality: Exceeds cheap plastic alternatives in durability.
- Value Pricing: Premium features at competitive price point.
❌ Considerations and Limitations
- Gen 3 Specific: Not compatible with older Starlink generations.
- Penetrating Installation: Requires drilling into mounting surface.
- Assembly Required: More complex than simple tripod alternatives.
- Permanent Setup: Best suited for fixed installations vs portable use.
- No Grounding: May require separate grounding for some installations.
📚 Additional Resources and Official Guidelines
Professional Starlink installation benefits from understanding FCC regulations and official safety guidelines that govern satellite internet equipment installation and operation.
Official Installation Resources
- FCC Antenna Installation Guidelines: – Official federal guidance on residential satellite dish installation requirements and regulations.
- OSHA Ladder and Fall Safety: – Comprehensive safety guidelines for working at height during antenna and satellite equipment installation.
These official resources provide essential background on safety requirements, regulatory compliance, and professional installation standards that ensure your Starlink setup meets all applicable codes and safety guidelines.
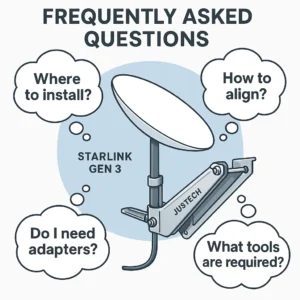
❓ Starlink Gen 3 Mount Installation FAQ
How long does Starlink Gen 3 installation take with the Justech mount?
Complete installation typically takes 45-90 minutes for experienced DIY installers, including site preparation, mounting, and initial system setup. First-time installers should allow 2-3 hours for careful positioning and troubleshooting.
Professional installation usually takes 30-45 minutes but includes site assessment, optimal positioning, and warranty coverage that justifies the additional cost for complex installations.
Can the Justech mount work with other Starlink generations?
The Justech mount is specifically designed for Starlink Gen 3 dishes and uses the unique mounting interface of that generation. It is not compatible with Gen 1, Gen 2, or rectangular Starlink dishes that use different mounting systems.
Attempting to adapt this mount for other generations will void warranties and may result in insecure installation that could damage equipment during weather events.
What’s the maximum wind speed this mount can handle?
When properly installed on structural mounting points, the Justech aluminum mount can handle winds exceeding 75 mph based on the dish’s wind loading specifications. The mount itself is rated for higher loads than the dish can safely handle.
Critical factors include proper mounting to structural elements (not just siding), using all provided hardware, and ensuring the mounting surface can handle the combined dish and wind loads without failure.
Do I need to ground the Starlink dish with this mount?
Grounding requirements vary by local electrical codes and installation location. The Justech mount doesn’t include integral grounding, so separate grounding may be required for code compliance in some areas.
Consult local electrical codes or a qualified electrician to determine if grounding is required for your specific installation. Proper grounding protects against lightning damage and electrical hazards.
How do I maintain the mount and dish after installation?
Regular maintenance includes quarterly inspection of mounting hardware for looseness, annual checking of weatherproofing at cable entry points, and clearing snow or debris that could obstruct the dish.
The aluminum construction requires minimal maintenance beyond periodic cleaning. Check that adjustment mechanisms operate smoothly and re-apply anti-seize compound to threaded adjustments annually in harsh weather areas.
What cable type is recommended for Starlink Gen 3?
Starlink Gen 3 requires the proprietary cable included with the system – no other cable type is compatible. This specialized cable combines power delivery and data transmission in a single outdoor-rated cable designed for temperatures from -40°F to 185°F.
Generic ethernet cables cannot provide the power requirements for the dish and lack the weatherproofing necessary for permanent outdoor installation. Using non-Starlink cables will void your warranty and prevent proper system operation.
Can Starlink cables be used outdoors permanently?
Yes, Starlink cables are specifically engineered for permanent outdoor use with UV-resistant outer jackets, waterproof construction, and temperature ratings suitable for all weather conditions including northern Michigan winters.
The integrated cable design eliminates outdoor connection points that could fail in weather, making it superior to generic outdoor ethernet solutions that require additional weatherproofing and signal amplification.
What if I need to relocate the dish after installation?
The Justech mount’s modular design allows dish removal without dismounting the base bracket. This enables seasonal adjustments, temporary relocation, or equipment servicing while maintaining the secure mounting foundation.
For permanent relocation, the expansion bolt installation means the base bracket will need to be removed and new mounting holes drilled at the new location. Plan mounting locations carefully to minimize relocations.
🏆 OTL Bottom Line: Complete Starlink Gen 3 Mount Installation Success
Professional Results: Following this comprehensive installation guide with the Justech aluminum mount delivers professional-grade Starlink Gen 3 setup that withstands harsh weather while providing optimal signal performance for remote connectivity needs.
Key Success Factors: Proper site assessment, structural mounting practices, and systematic installation approach ensure long-term reliability and maximum signal strength from your Starlink investment.
Installation Reality: While DIY installation is achievable for most users, the combination of height safety, structural requirements, and precision positioning makes this a project that benefits significantly from careful planning and proper tools.
⚠️ Professional Installation Worth Considering: For installations above single-story height, complex roof geometries, or where structural integrity is questionable, professional installation provides safety and warranty benefits that justify the additional cost.
Starlink Gen 3 Installation Recommendations
- Best For: Permanent installations, harsh weather locations, optimal signal priority
- Great Choice: DIY enthusiasts with proper tools and roof access experience
- Consider Professional Help: Complex roof installations, height concerns, structural uncertainty
- Skip DIY If: Uncomfortable with heights, lack proper tools, rental property restrictions
- Proceed When: You have clear sky view, structural mounting surface, safety equipment
This complete Starlink Gen 3 mount installation guide provides the foundation for professional-quality satellite internet setup that delivers reliable connectivity for remote work, off-grid living, and outdoor communication needs.
Our field-tested approach using the Justech aluminum mount combines proven installation techniques with quality hardware that ensures your Starlink system performs optimally regardless of weather conditions or environmental challenges.
Whether you’re upgrading from a temporary ground setup or installing satellite internet for the first time, following these systematic installation practices delivers the robust, weatherproof connectivity solution that modern outdoor living and remote work demands.

- 【Only for Starlink Gen 3】Our Starlink pole mount kit is specially designed for Starlink Gen 3. Suitable for various inst…
- 【Premium Aluminum Material】Made of high-quality aluminum alloy, our Starlink mounting kit is sturdy and waterproof. With…
- 【360° Adjustable】With 360° rotating and 20° tilt adjustment of the upper base, and 90° adjustment of the lower base, you…

Leave a Reply